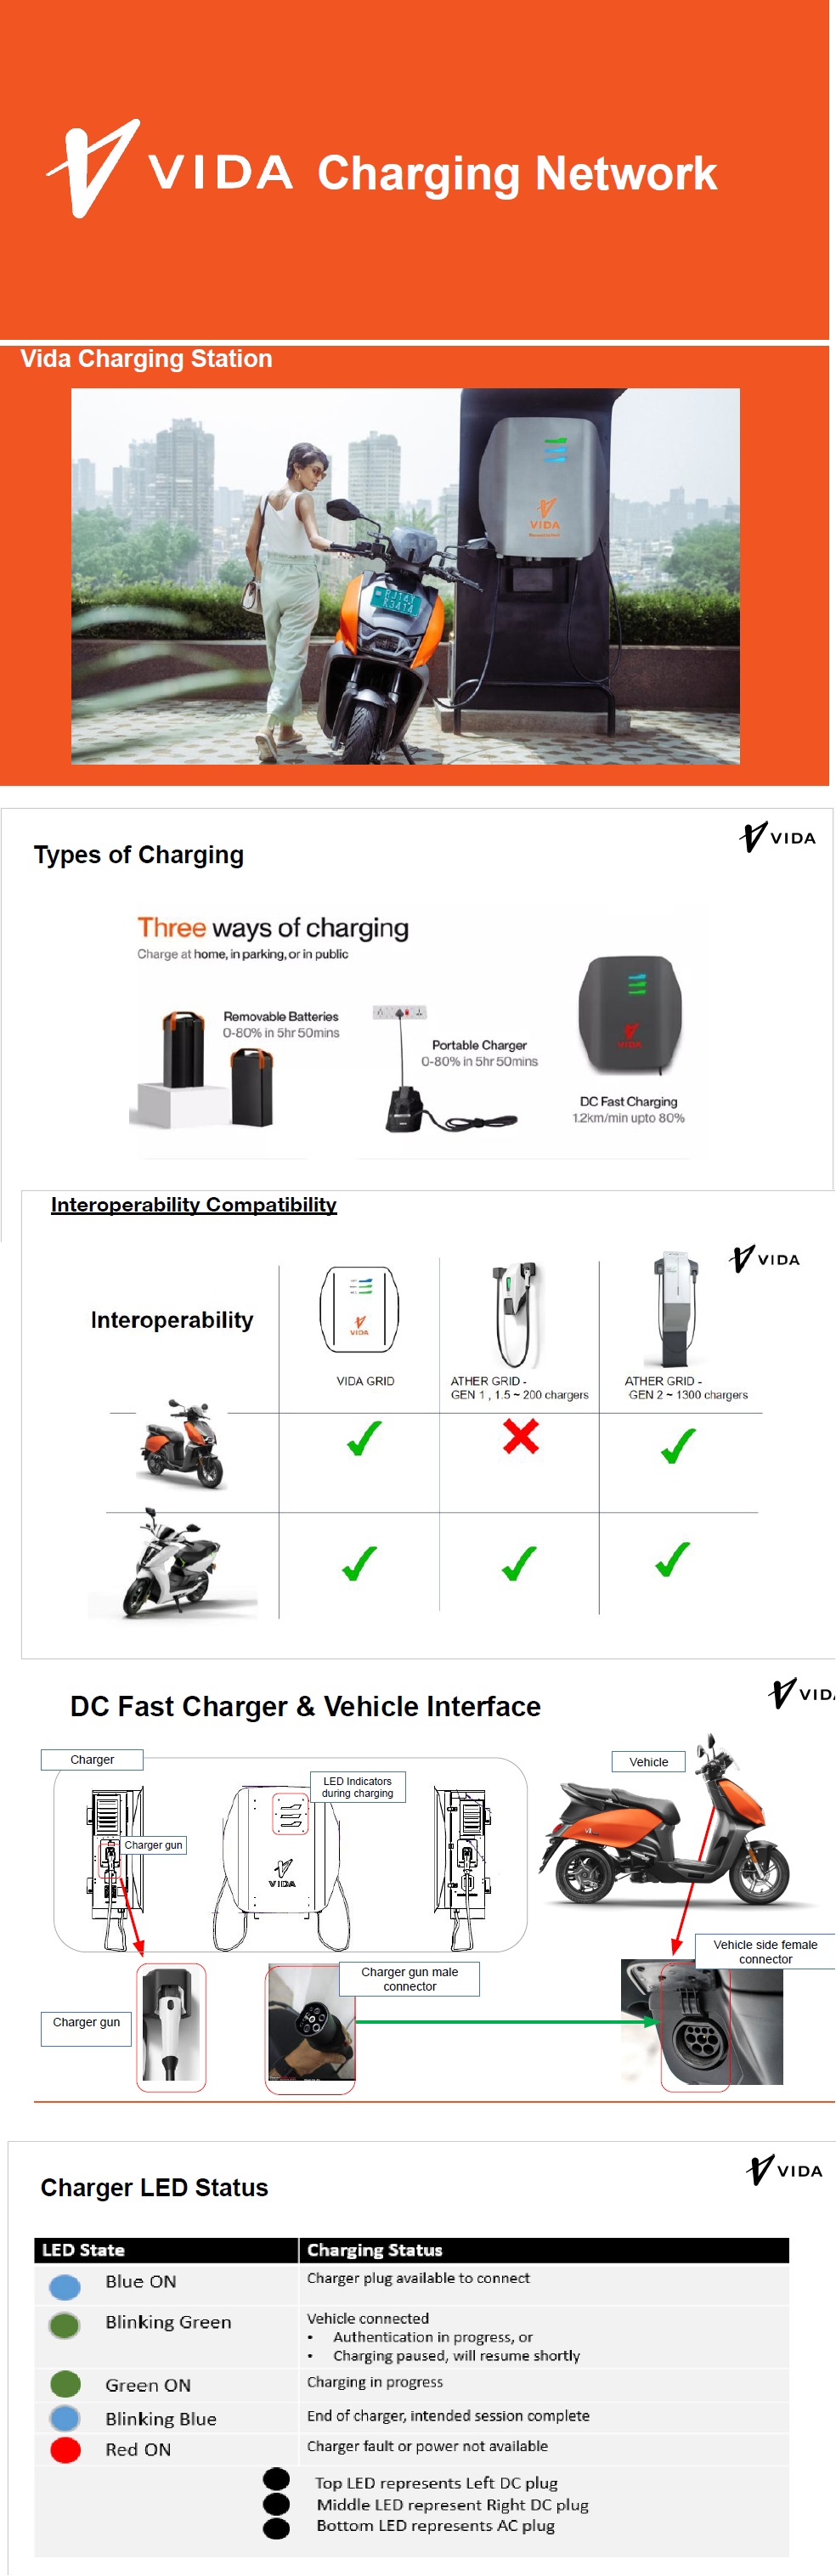
While riding, if SOC level is low or remaining charge is not enough to reach the desired destination, the user can charge the vehicle at charging station. The nearby charging station can be accessed through MY VIDA Customer Application. Charging station has both AC and fast charging outlets. User can choose any of the outlets through MY VIDA Customer Application.
• Regular AC charging outlet could be used to charge the vehicle at slower pace than Fast Charger; But it is highly recommended as the overall time taken is still well within reasonable limit. The user has to carry portable charger with the vehicle if user wants to charge the vehicle in AC charging outlet. The time taken for charging is same as charging with portable charger.
• Fast charger is there to charge the vehicle quickly when paucity of time doesn't add value. Vehicle can be charged from 0% to 80% in 60 minutes and 0% to 100% in 1 hr 20 minutes.
Note: - Charging time may vary depending on ambient and battery temperature conditions.
Fast Charging (Under standard testing conditions at 25 degree Celsius ambient temperature | Actual may vary)
7P- 2 batteries
0-80% - 62min
80-90% - 16 min
90-100% - 47 min
0-100% - 120 min
8P- 2 batteries
0-80% - 65 minutes
80-90% - 17 minutes
90-100% - 48 minutes
0-100% - 130 minutes
9P- 1 Battery
0-80% - 62 Minutes
0-100% - 120 Minutes
Fast Charging Do's: -
* Use the VIDA App on your smartphone to charge your EV
* Handle the DC Plug gently and place it back after you are done charging
* Park your EV in the designated area only
* Call our Support number to help you if you face any issues
* Unplug DC gun from Vehicle in case of Payment Failure and App Error.
Fast Charging Don't: -
* Do not pull the Plug Out while charging is in progress
* Do not start charging if the equipment seems damaged
* Do not leave the vehicle in the designated parking after charging session is completed
SOP to initiate Fast Charging on VIDA Vehicles at ATHER Grids
*1.* There are currently no monetary charges% to be paid by VIDA Customers at Ather Grid Charging Stations. In case someone is asking for payment or applicable charges, please escalate it to either ATHER Customer Care or VIDA Customer Care.
% - In the future there could be mandatory charges*."
*2.* VIDA Customers can use Connectors at Ather Grid but only using Fast Charging Gun. Three Pin AC Socket (AC Slow Chargers) will not work for VIDA Portable Chargers.
*3.* VIDA Customers would be able to charge at *ATHER Gen 2.0 onwards* fast charging stations only. If customers can't differentiate between Ather older version Chargers and *ATHER Gen 2.0* Chargers, customers are advised to follow VIDA Customer App indicated Charging Stations.
*4.* No software update is required to be done on Vehicles to enable Charging at ATHER Grid Charging Stations.
*5.* If the Battery Percentage of VIDA Scooter is above or equivalent to 80%, then VIDA Vehicle will not charge beyond that battery SOC level at ATHER Grid Charging Stations. - - - *Important*
*6.* It is recommended that the customers need to ensure the handle is securely locked in place for charging to be initiated - - - - *Most Important*
*7.* It takes some time for the charging session to start and hence it is advised that the customer should wait for around *1 minute* after connecting the scooter gun for charging to be initialized.
Customer Queries
FAQs - Vida Network
❑ Charging did not start when I plugged in the Charger Gun. What should I do?
1. Please refer the status of LED color.
❑ Charger LED is red/off what should I do?
1. Kindly move to nearest fast charger (Ather/Vida).
2. Log a complaint and escalate for resolution.
❑ Charger was not working, so I pressed the RED button on the side of charger, now the LED is red, What
should I do?
1. For information emergency button is for emergency cases like fire and other scenarios only.
2.Follow above step for red LED on VIDA DC fast charger.
To Do during charging at Ather Grid
FAQs - Ather Grid
❏ SOC Threshold (<80%)
If customer tries to charge at Ather beyond 80% it may not allow as Ather grid has threshold set at 80%
❏ Handle Lock
To be able to initiate charging on Ather Grid in particular handle should be properly locked (Ather/Vida).
❏ Initiation Period
Customer should allow at least 1-minute charging to initiate the charging session.
Customer Queries
FAQs - Ather Grid
❏ The Public Grid Charger is not working, what should i do?
1. Please follow the LED pattern.
2. [See instructions below for 1) Off, 2) Green, 3) Red]
❏ The Public Grid Charger is not working, LED is off, what should I do?
1. If there is a host nearby, ask the host for help
a. If the host is able to help - Good. End conversation
b. If the host is not able to help - “Sorry for the inconvenience” and kindly raise a ticket on the grid point
2. If there is no host - “Sorry for the inconvenience” and Kindly raise a ticket.
❏ The Public Grid not working, LED is red, what should I do?
1. “Sorry for the inconvenience” and Kindly raise Ticket.
In MY VIDA Customer Application, user can find the charging station or can book the charging and timing slot. To find and book a charging station follow the steps below: -
• Open the MY VIDA Customer Application.
• Click on the charging station symbol (1).
• App will show all the nearest charging station(s) (2).
• User can select the charging station according to their location.
• All available charging stations will be shown in the app.
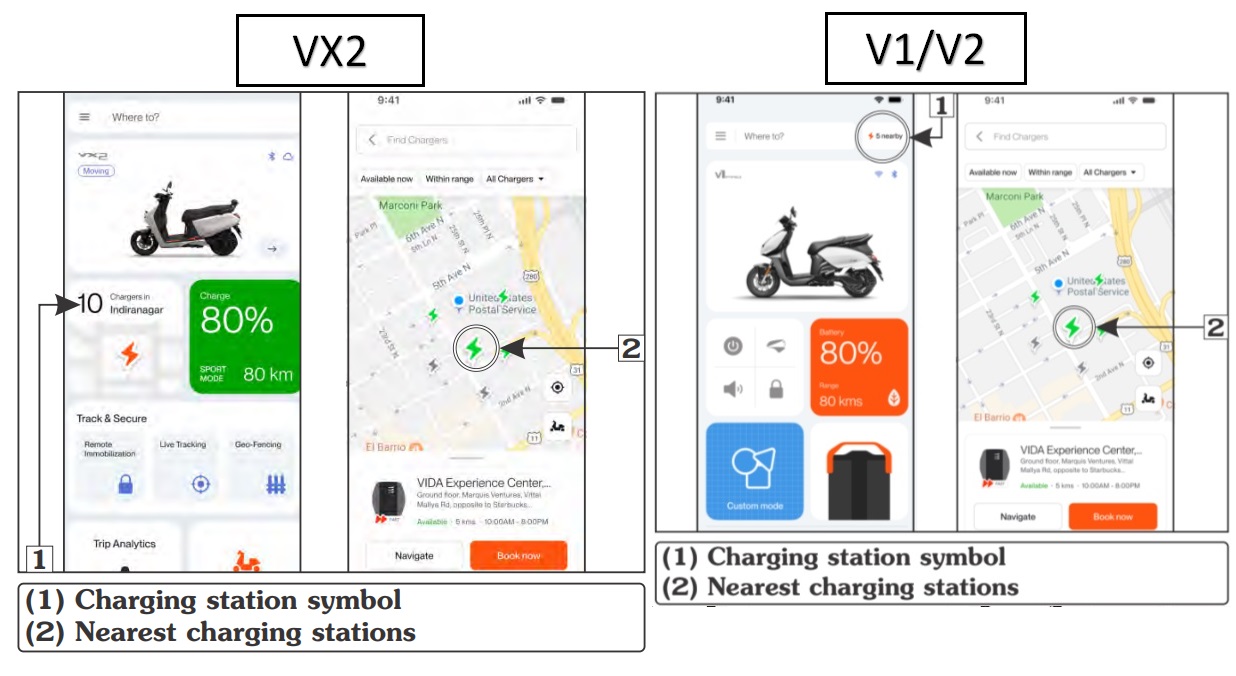
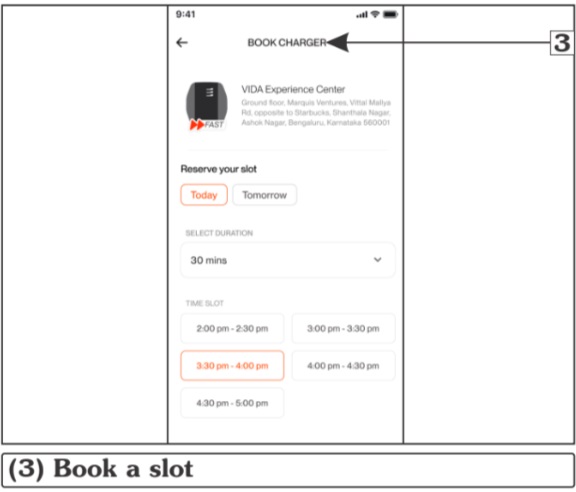
• After selecting the charging station check the availability of the charger (It will show the available charging points).
• If charger is available, user can directly walk-in to the charging station and charge the vehicle or user can book a slot (3) (booking date & time, charging time, type of connector, estimated units and estimated price will be available during booking of charger).
Charging the vehicle at the station
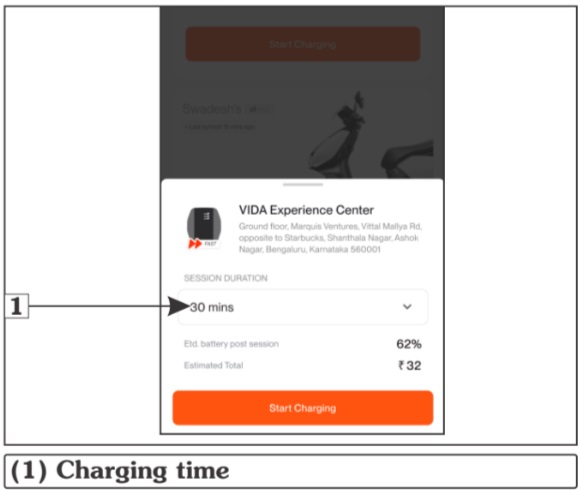
When the MY VIDA Customer Application navigates the user to desired charging location, user can initiate the charging by following the below listed steps:
• Turn the vehicle to power “OFF”.
• Open the MY VIDA Customer Application.
• Select the desired charging time (1).
• Added range and units
• Cost will be displayed accordingly.
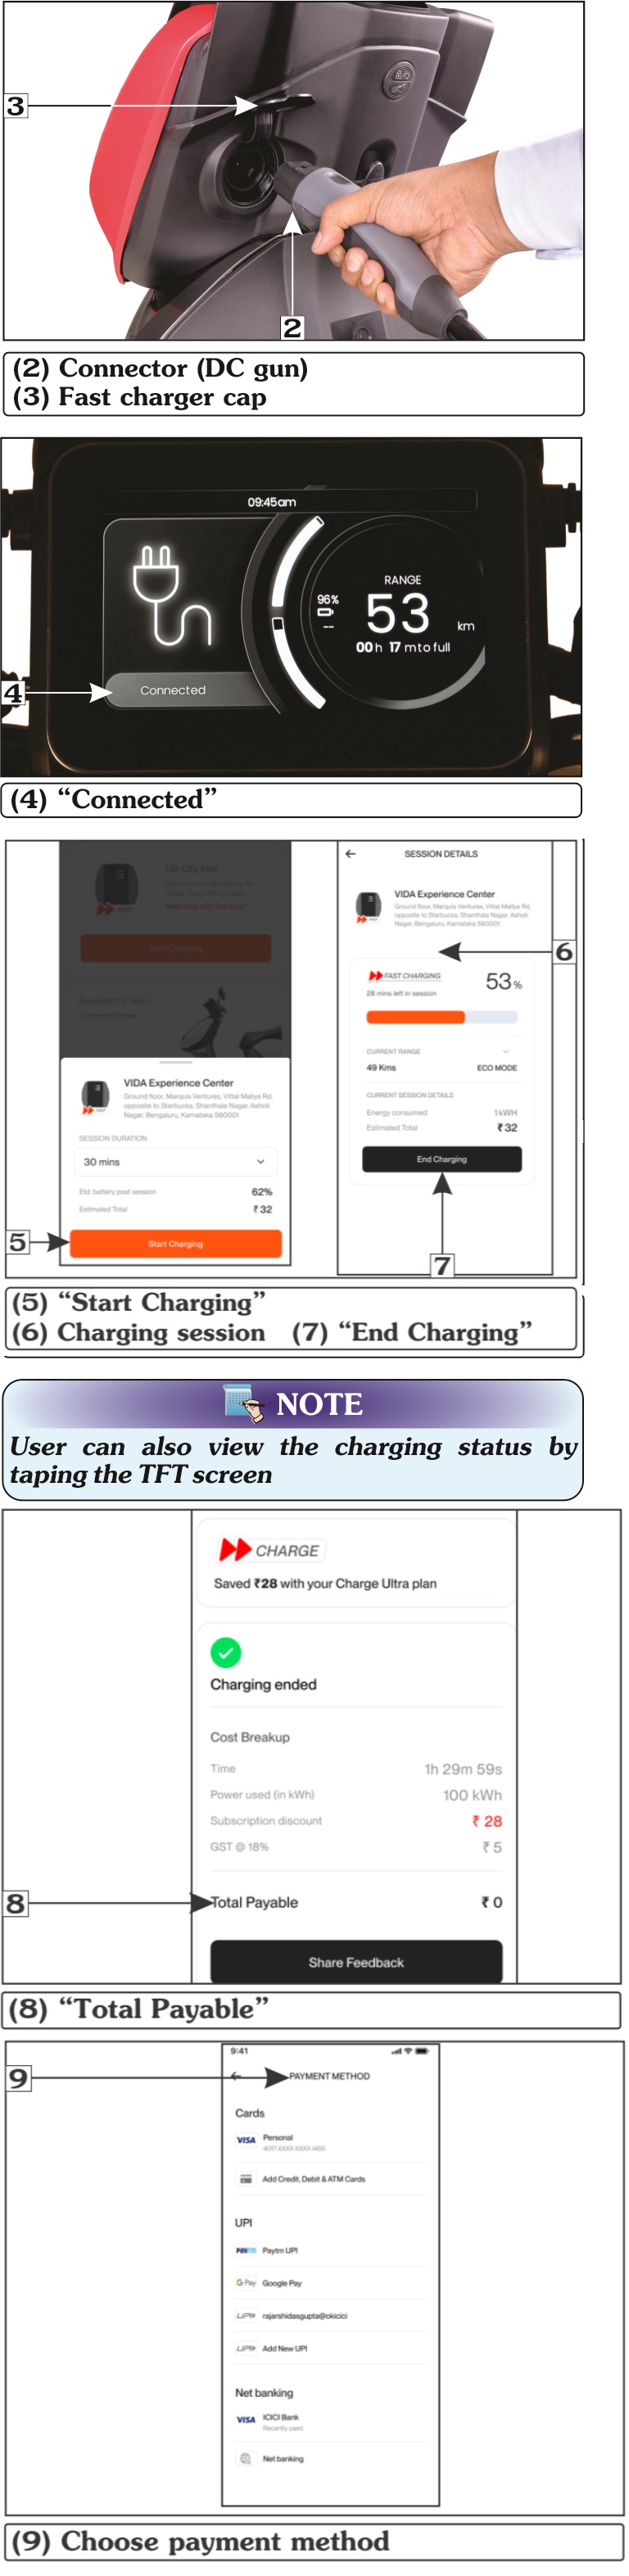
• Gently pull down the connector (2) (DC gun) from the charging unit.
• Open the fast charger cap (3) and plug the connector into the vehicle properly.
• When connector is plugged in properly, click sound can be heard. It will lock the connector in the vehicle.
• TFT/LCD will display the “Connected/ Charger Linking” screen which means that charger is connected to the vehicle properly.
• Click on “Start Charging” in the app to start charging when connecter is connected into the port properly.
• Charging session will start and it will show the progress detail of charging in the app.
• If the user wants to stop the charging in between charging time, it can be done by clicking on “Stop Charging”
• When the charging is completed, app will display time taken, amount, SOC level and units consumed.
• Now, user has to click on “Pay” to initiate the payment.
• User can choose payment method (9) through which payment will be done.
• When the charging session is completed unplug the charging connector and put it back into the charging unit properly.
• Close the fast charger cap.
VX2 Charging SOPs:-
1. Invoice Generation and VIN Mapping
Customer invoices are generated through the Hero Connect platform;
The Vehicle Identification Number (VIN) is automatically mapped at the stage of invoice
generation.
2. Missed VIN Mapping Cases
In certain instances, VIN mapping may not occur during invoice generation.
Alternatively, Customers can also reach out to VIDA Customer Care Number @ 1800-266
8432 to get the status/ conformation on VIN mapping.
Customers are advised to log in to the My VIDA App using their registered mobile number
and check the associated VIN on the My VIDA App to get the confirmation status;
This additional login step ensures that the VIN is positively mapped to the customer’s
account.
3. Provision for Unregistered/ Un-Invoiced Vehicles
For all unregistered or un-invoiced vehicles, a provisional credit of 10 units (kWh) is provided.
This credit allows either the dealership team or the customer to perform charging sessions
on VIDA Fast Chargers (only), until the allocated 10 units are fully utilized.
4. Charging on Ather Grid
VIN mapping is mandatory to initiate fast charging sessions on the Ather Grid network.
Consequently, unregistered or un-invoiced vehicles will not be able to charge on Ather
Grid chargers until their VINs are properly mapped.
INITIATE Fast Charging on VIDA VX2 Plus Vehicle on VIDA FC Network: -
1. Check Charger Availability
Open the My VIDA App and check the real-time status of nearby chargers.
Alternatively, observe the LED status on the charger front panel on the nearby VIDA Charger:
Solid BLUE: Charger AVAILABLE
Solid GREEN: Charger OCCUPIED (Charging in Progress)
Solid RED: Charger FAULTED (Not Available)
2. Park the Vehicle
Safely park the scooter near the charger ensuring easy reach of the charging gun.
Keep the side stand engaged and ensure stability.
3. Switch OFF the Vehicle
Turn the key to OFF position and lock the handle.
Ensure the ignition and display are completely OFF before connecting the gun.
4. Insert Charging Gun
Hold the charging gun firmly and align it properly with the fast charging inlet/socket located
on the left side of the vehicle (below handlebar).
Insert the gun completely until a “click or locking” sound is heard, indicating that the solenoid
lock has engaged.
5. Observe Vehicle Display Message
The TFT display on the vehicle will show “CHARGER LINKING”, indicating handshake initiation.
6. Observe Charger LED Indication
The corresponding LED on the charger will start blinking GREEN, signifying communication
and safety checks between vehicle and charger.
7. Wait for Communication handshake
Allow at least 15–20 seconds for the charger and vehicle to complete handshaking and
establish communication on parameters like voltage, current, temperature, and safety
checks.
8. Charging Initiation
Once the charger validates all parameters and receives charging permission from the
vehicle’s BMS/ VCU, charging will commence automatically.
The vehicle TFT will display “FAST CHARGING”.
9. Confirm Charger LED Status
Once charging starts successfully, the LED indicator on the charger will turn Solid GREEN,
confirming active charging session.
10. Monitor Progress
Charging progress and percentage can be monitored on the vehicle’s TFT display or My
VIDA App.
STOP Fast Charging on VIDA VX2 Vehicle on VIDA FC Network: -
1. If the Customer wants to STOP the ongoing Charging Session on the Vehicle
Turn the key to ON position and un-lock the handle.
Press START and BRAKE simultaneously for 1 second and wait for atleast 2 seconds as per
indication shown on TFT;
Click sound/ Unlock sound is heard;
FORCED STOP message will be displayed on TFT Screen;
Charging Gun is safe to remove from the Vehicle Inlet;
2. If the Customer has achieved 80% SOC on the Vehicle
FULLY CHARGED message will be displayed on TFT Screen
Turn the key to ON position and un-lock the handle.
Press START and BRAKE simultaneously for 1 second and wait for atleast 2 seconds as per
indication shown on TFT;
Click sound/ Unlock sound is heard;
FORCED STOP message will be displayed on TFT Screen;
Charging Gun is safe to remove from the Vehicle Inlet;
3. Missing any of the above steps may lead to Charging Gun getting stucked with Vehicle
In such case, Customer should not panic and should not try to forcefully detach the Charging
Gun from the Vehicle;
Customer should push the Charging Gun slightly inside and turn the key to ON/OFF position,
once Click sound/ Unlock sound is heard and FORCED STOP message is displayed on TFT, it is
safe to detach the Charging Gun from the Vehicle;
If issue persists, Customer should call on VIDA Customer Care Number @ 1800-266-8432 to get
the urgent help thru RSA;
Alternatively, the customer can manually detach the Charging Gun if they are comfortable
performing a simple troubleshooting step. This is achieved by the customer inserting their
hand behind the charging socket from the front wheel well and pulling the solenoid wire to
unlock the solenoid and free the charging gun.
CAUTION: -
• Do not leave the connector on the ground. There’s a risk of damage and water entry.
• Do not try to forcefully pull the connector out, it should come out swiftly.
Safety precautions for fast charging
• Do not touch the body or cable/connector with wet hands.
• Ensure the fast charger body LED should be a stable blue color. Do not try to attempt if the LED is red.
• Never touch the charger body and handle the cable from the gun side.
• Do not try to pull cable and park the vehicle near the fast charger as much as possible.
• Do not pull out the gun from the vehicle during charging (stable green color of LED).
Do’s and Don'ts for charging station
Do's
• Use the Vida Application on your smart phone to charge your vehicle.
• Handle the DC Plug gently and place it back after you are done charging.
• Park your vehicle in the designated area only.
• Call Customer Support number for help if you face any issue.
Don'ts
• Do not pull the plug out while charging is in progress.
• Do not start charging if the fast charger seems damaged.
• Do not leave the vehicle in the designated parking after charging session is completed.