INSTALLATION OF THE VIDA APPLICATION
Vida application is available in the google play store (for androids) and App Store (for iOS), which can be installed in your device to monitor and transmit various vehicle data such as battery, motor and other electrical systems. The vehicle data allows for various remote functions and services.
NOTE:
• Vida application is not mandatory for proper running of vehicle.
• Compatibility and performance of Vida application may vary based on your device and software version.
• Application needs GPS signal, internet connectivity to perform the desired navigation functionality.
Pairing the My VIDA Customer App With the Vehicle VIDA V1
To connect your Vida with the App…you have to first install it.
You can download CApp from your android…or iOS devices from Google Playstore to iOS App Store…in both the instances download page of CApp opens up.
Can’t find the CApp?...Don’t worry…VIDA will send you an email with the link…and the guidelines to download it
Click on the link…download it…and install it…The access rights to the Google Drive will be configured beforehand for all customers
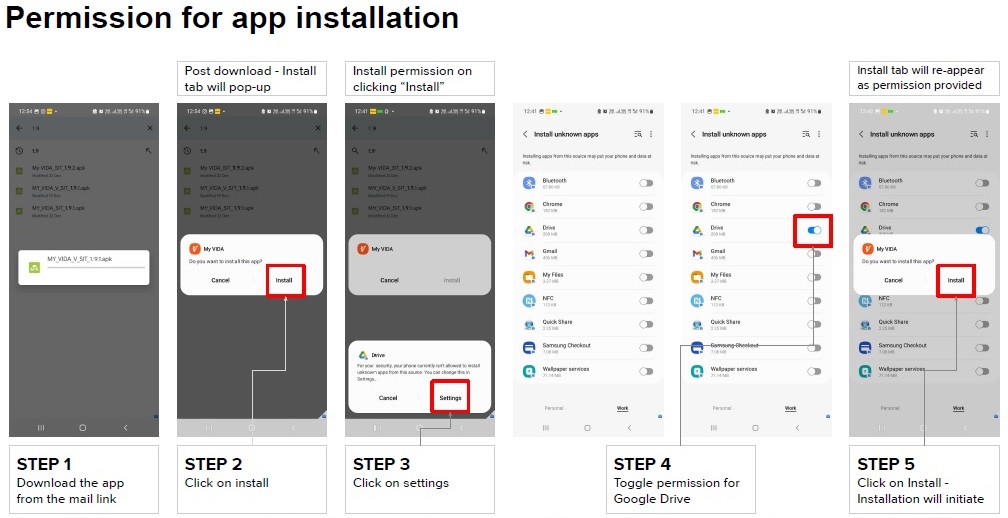
To install the CApp…you have to allow the source…to do that…
Click on install…after downloading the app
Click on settings
Toggle permission for google drive
Click on install
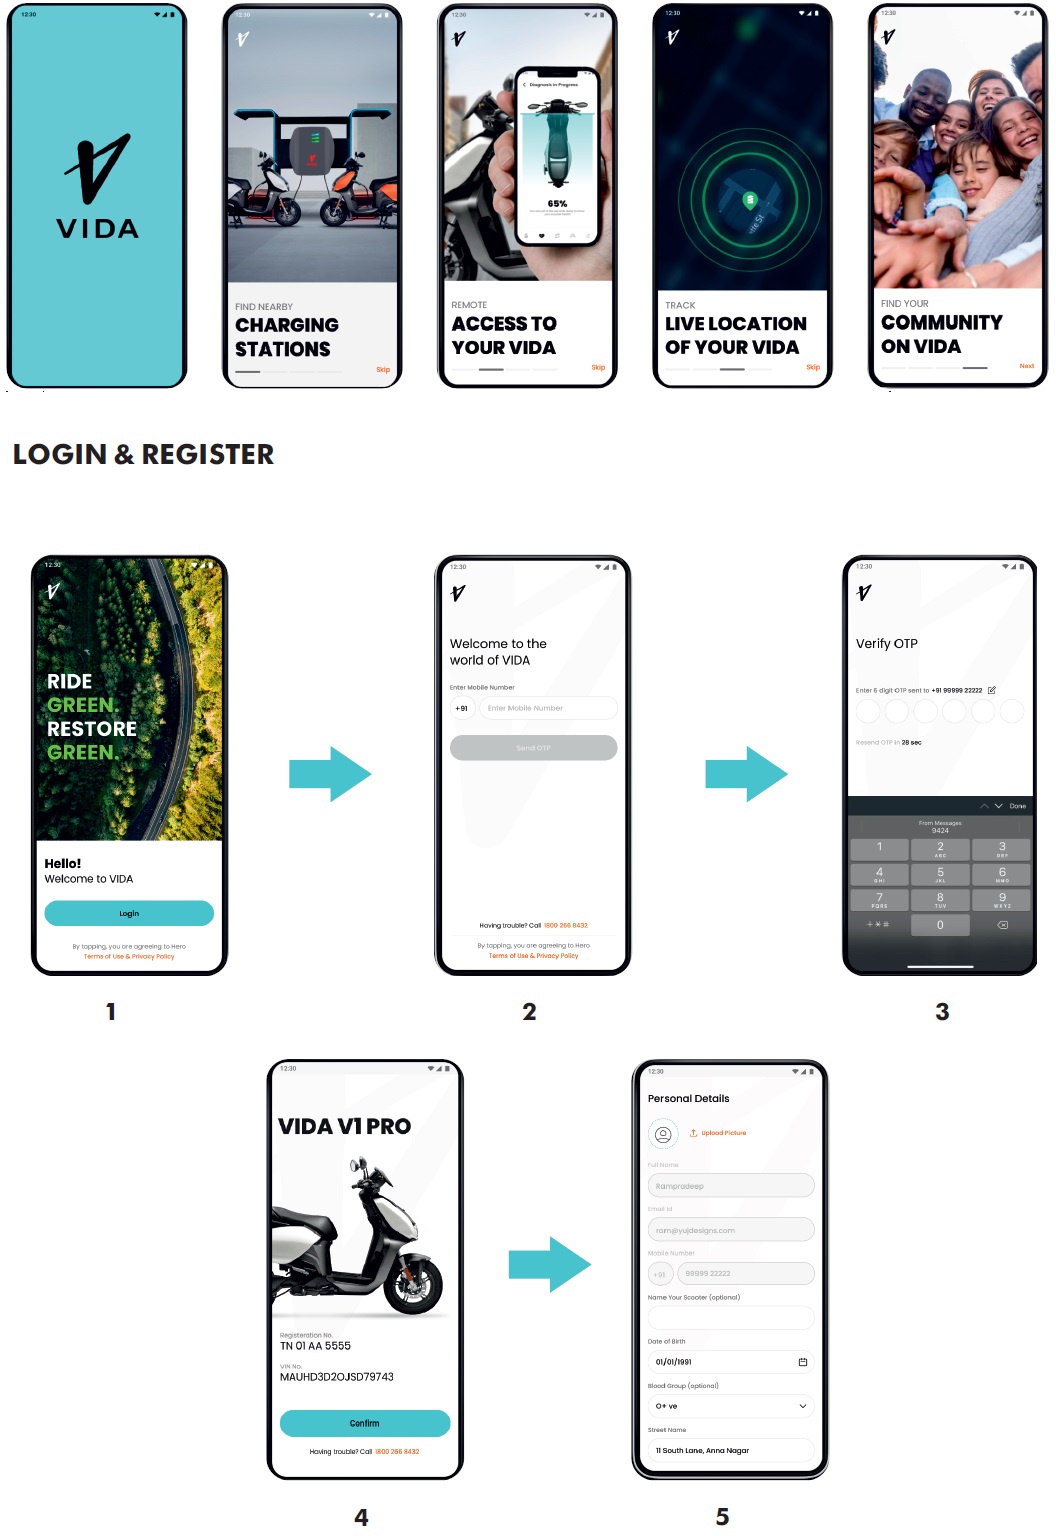
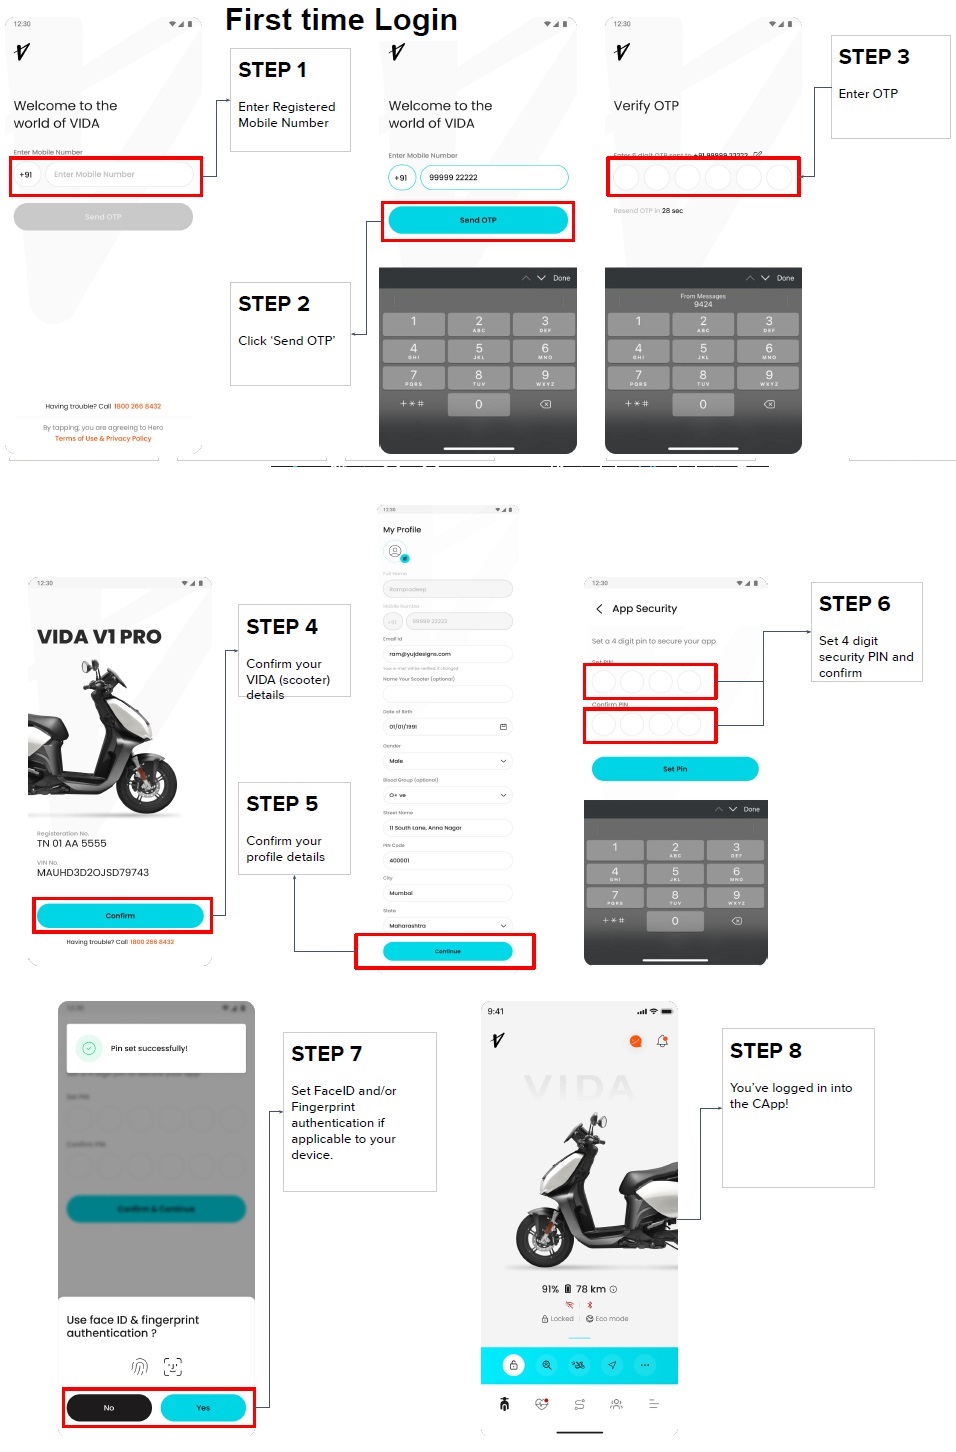
To log in into the CApp for the first time…follow these steps
Open the App…and enter your registered mobile number
Click on ‘Send OTP’
Enter the OTP
VIDA details screen will pop up…click on ‘Confirm’
My Profile section will open up…Fill in your personal details…Click on continue
Set four digit security PIN…and click on ‘Set Pin’
The hand types in the security PIN…and clicks on the ‘Set PIN’ button.
Make sure to fill all the mandatory fields…
Your name, mobile number, Email and DoB are fetched from DMS…so complete them during the sale process only
If applicable to your device…Set Face ID or fingerprint authentication
You have now logged into the CApp
Make sure to keep your VIDA on for 5 minutes…once the App is installed…
Incase the info is missing about SoC and Range…keep the vehicle running for 5 minutes
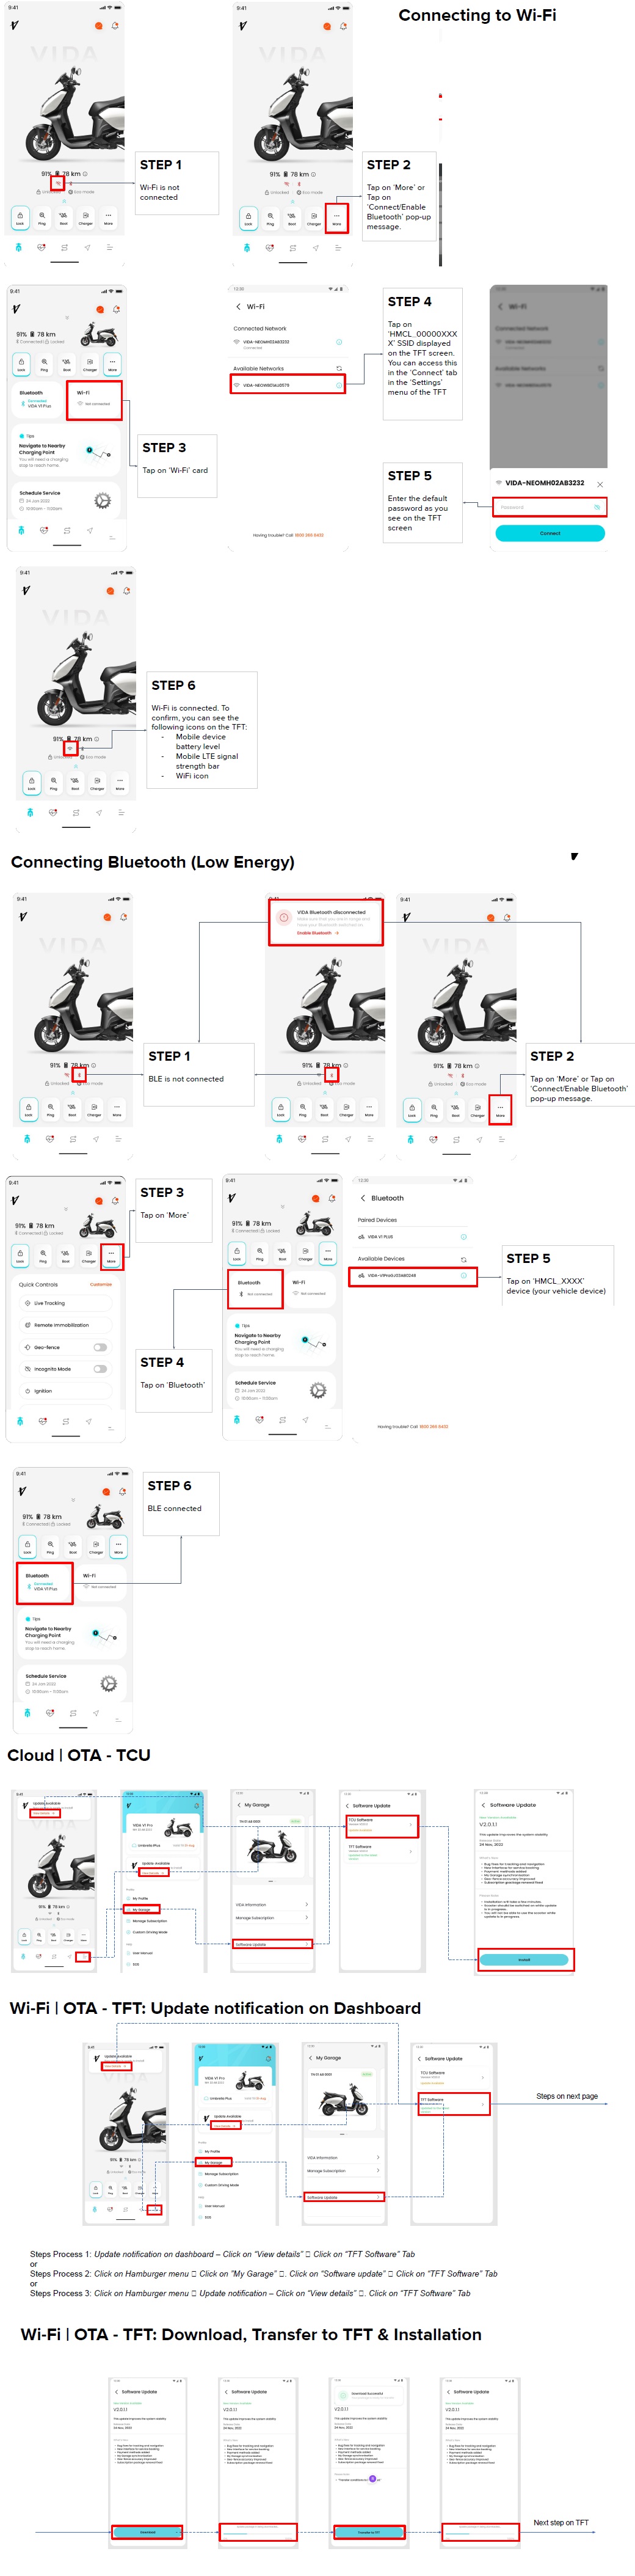
Now you are ready to connect your App to VIDA…through Wi-Fi…or Bluetooth
The Phone’s Wi-Fi should be on…and not connected to any other network
Also, the TFT shouldn’t be connected from the phone's WI-Fi setting…If it is…forget the network and reconnect using CApp’s Wi-Fi setting
To connect tap on ‘More’ on ‘Connect/Enable Bluetooth’ pop-up message
Tap on ‘Wi-Fi’ card
Tap on the ‘HMCL_00000XXX X’ SSID displayed on the TFT screen…The last 4 digit will be your device number
It can be accessed through the ‘Connect’ tab…in the settings menu of the TFT
A Navigational montage on the process of accessing the SSID.
A default password will be displayed on TFT…enter it
You are now connected to Wi-Fi…To confirm…look for the following icons on the TFT…Mobile Device Battery level…Mobile LTE signal strength bar…Wi-Fi icon
Through Bluetooth (Low Energy)
If the Bluetooth icon in the Vida App is red, the bluetooth is not connected
Tap on ‘More’ or Tap on ‘Connect/Enable Bluetooth’ pop-up message
Again tap on ‘More’...then tap on ‘Bluetooth’
Tap on HMCL_ followed by the four digits of your device number
Somethings to remember:
Make sure phone’s BT is ON
Vehicle shouldn’t be connected via App settings
If connected from phone’s setting forget from there
Make sure vehicle is in ON state till pairing is completed
If required, run the motor for 1 minute
CApp | Download on Customer
Mobile Device
User Guide
Downloading CApp on Customer Mobile Device
Steps to follow
1. CApp is available for Android and iOS users. iOS will have certain features that are currently unavailable. This document is to guide you through CApp installation on Android.
2. If CApp is not listed on Google Play Store, you will receive an email from VIDA with guidelines to download the CApp on your Android mobile device.
3. The email will contain a link to download the app file. Below is the link:
https://drive.google.com/drive/folders/11eldy5e6r8CPNJ2yQhHwi4i5atlJ4KvQ?usp=share_link
https://rb.gy/yukrwy (Shortened URL)
4. Access rights to the Google Drive will be configured beforehand for all the customers.
5. Once the customer downloads the file, user will be required to install the apk by allowing the source.
6. Once installation is complete, the customer will have to open the CApp and agree to all the permissions that are requested to access full potential of the
CApp.
7. Product Specialist (or Service Executive) will guide the customer to connect the vehicle with the CApp via BLE and Wi-Fi for the first time based on the set up guides.
Permission for app installation
CApp | Login
User Guide
First time Login
Checklist:
- Make sure all the mandatory information are filled
- Name, Mobile, Email and DoB are fetched from DMS, must be completed during the sales process
Checklist:
- Make sure vehicle is ON state for 5 mins once the App is installed
- In case, if there is missing info about SoC and Range, Run the vehicle for 5 mins.
CApp | Wi-Fi and BLE
User Guide
Connecting to Wi-Fi
Checklist:
- Phone’s wifi should be ON condition; should not be connected to any other network
- TFT shouldn’t be connected from phone’s wifi setting; In this case forget the TFT from phone’s setting & Connect from App wifi setting
Connecting to Wi-Fi
DOs
- Connect to Wi-Fi for the first time from the CApp only.
- Ensure the steps are followed step by step.
DON’Ts
- Do not connect to Wi-Fi from the mobile device settings.
- If the Wi-Fi was connected via the mobile device settings:
- Forget the SSID connection in the mobile device settings
- Restart the CApp and follow the ‘Connect Wi-Fi’ steps
Connecting Bluetooth (Low Energy)
Checklist:
- Make sure phone’s BT is ON state
- Vehicle shouldn’t be connected via App settings; If connected from phone’s setting forget from there
- Make sure vehicle is ON state till pairing is completed; If require run the motor for 1 mins
Connecting Bluetooth (Low Energy)
DOs
- Bluetooth should auto-connect. It might take a few minutes the first time for it to connect (first time login and connection).
- Connect to Bluetooth (BLE) for the first time from the CApp only.
- Ensure the steps are followed step by step.
DON’Ts
- Do not connect to Bluetooth from the mobile device settings.
- If the Bluetooth was connected via the mobile device settings:
- Forget the BT address connected in the mobile device settings
- Restart the CApp and follow the ‘Connect Bluetooth (Low Energy)’ steps
CApp | OTA - TCU and TFT
User Guide
Cloud | OTA - TCU
Steps Process 1: Update notification on dashboard – Click on “View details” 🡪 Click on “TFT Software” Tab 🡪 Click on “Install”
or
Steps Process 2: Click on Hamburger menu 🡪 Click on ”My Garage” 🡪. Click on “Software update” 🡪 Click on “TFT Software” Tab 🡪 Click on “Install”
or
Steps Process 3: Click on Hamburger menu 🡪 Update notification – Click on “View details” 🡪. Click on “TFT Software” Tab 🡪 Click on “Install”
Wi-Fi | OTA - TFT: Update notification on Dashboard
Steps Process 1: Update notification on dashboard – Click on “View details” 🡪 Click on “TFT Software” Tab
or
Steps Process 2: Click on Hamburger menu 🡪 Click on ”My Garage” 🡪. Click on “Software update” 🡪 Click on “TFT Software” Tab
or
Steps Process 3: Click on Hamburger menu 🡪 Update notification – Click on “View details” 🡪. Click on “TFT Software” Tab
Wi-Fi | OTA - TFT: Download, Transfer to TFT & Installation
Steps 1: Click on “Download” Tab.🡪 Wait for 100% progress completion
Steps 2: Click on “Transfer to TFT” Tab.🡪 Wait for 100% progress completion
Steps 3: On TFT screen click on installation sign